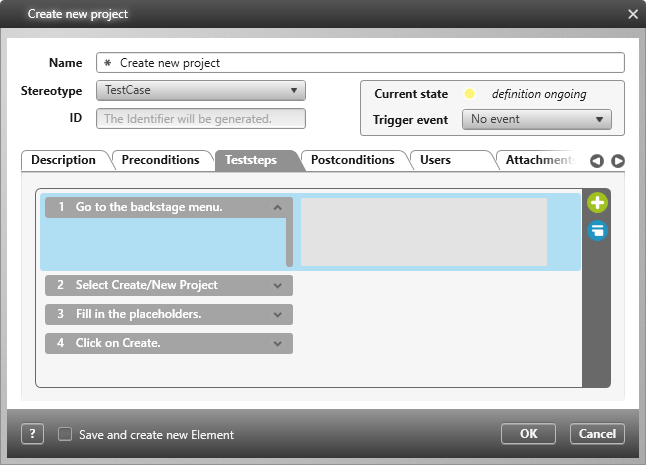
Dialog “Create Test Case”
A test case describes an input scenario and its expected results in great detail. You use test cases to check whether a requirement or use case story has been implemented correctly and completely.
Dialog opens:
- in the requirement diagram, select Create Test Case
- in the context menu of a package with the Create / Test Case command
- in the slicing pane under slices with the Plus button
The dialog
Name Enter the name of the test case here.
Stereotype Select the appropriate stereotype from the dropdown list. The stereotype determines whether and which values can be defined on the Further Properties tab.
ID The ID of a test case is automatically generated according to the specifications for the «TestCase» stereotype.
Current state Shows the current state and the corresponding icon of the test case.
Trigger event All events that the test case can trigger are offered in the Trigger event dropdown list. As soon as you select an event, the state of the test case is automatically changed when it is saved.
Tab “Description”
Here you can describe the test case in detail.
Tab “Preconditions”
Preconditions Specify here the conditions that must be met before the test execution.
Test inputs Enter values, parameters, and so on, with which the test case is to be executed.
Tab “Teststeps”
Here you can formulate the concrete procedure of the test. Use the plus button to insert a scenario step and the red button to remove the selected step.
Tab “Postconditions”
Postconditions Specify the conditions that are to be achieved as a result of the test case run.
Expected results Specify the output that is expected when the tested requirement works correctly.
Tab “Users”
Here you select project team members in the subsequent dialog box. Use the red X button to remove the project team member.
Tab “Attachments”
Use the Plus button to store additional documents that provide further information on the test case. Documents can only be selected if you have previously stored them in a directory.
Tab “Verified Elements”
This tab displays all requirements and use cases that have a verify relationship with the test case. You can edit the assignment of test case and requirements or use cases immediately in dialog mode: The green button opens a selection dialog in which you can assign further requirements/use cases to the test case. Use the red button to remove the verify relationship again. The requirement/use case itself remains in the project.
With Show Definition you open a view in which the requirement and its context are displayed.
Show Diagrams opens a dialog that lists all diagrams that contain the requirement.
Tab “Activity Diagrams”
If the test case is used in activity diagrams, the diagrams are listed here.
Tab “Further Properties”
What you see on this tab depends on the stereotypes assigned to it. If user-defined properties have been created for this stereotype, you can enter these values here.
Tab “Variations”
You can use the Plus button to store variations for the test case, if available in the project.

