Dialog “Edit Query”
Use queries to retrieve specific information and data. You can narrow down the result list of a query further using filters or export it directly into an MS Excel/Word document.
The dialog can be opened:
- via context menu of a package with the command Create other/ Query
The dialog
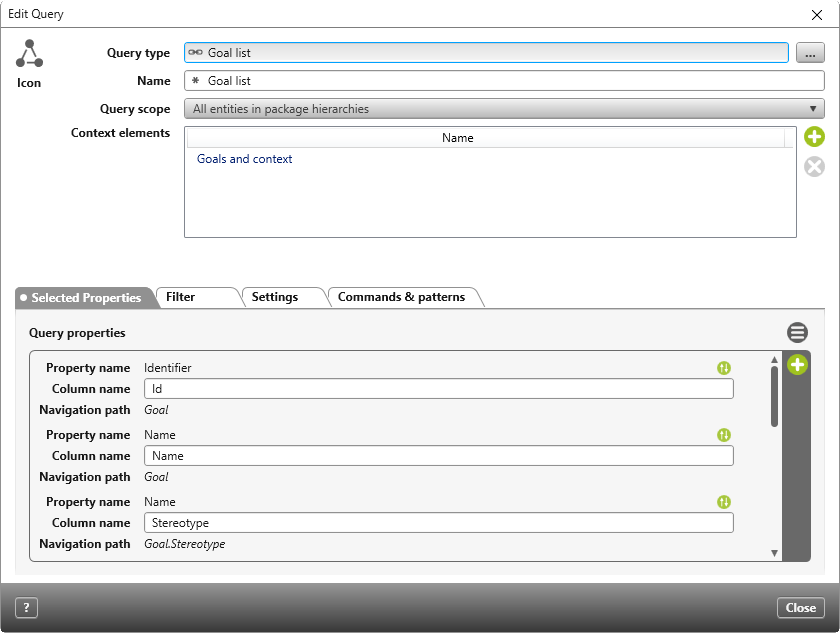
Query type Choose a query type from those available within the system. Which properties and other elements can be included in the query, depends on the type you choose here.
Name Enter a semantic name for the query in this field. It will be used and displayed in all diagrams and views.
Query scope Which entities should be included in the query? The entities of the entire system or those of the current package? With or without its subordinate package? Use this drop-down list to specify which entities the query should include.
| All entities of current project | You do not need a context element. The query displays all elements of a type that are in the project. |
| All entities of packages | The query shows all elements of a type that are in a package. |
| All entities in package hierarchies | The query shows all elements of a type that are in a package. If the package contains other packages, these are also taken into account. |
| All entities of artifacts | All elements of a specific artifact are displayed here. For example, if you want to see all tests for a Test Set execution. |
| All entities in artifacts hierarchie | When you use an artifact to represent a hierarchy, all elements that you are within the hierarchy are displayed. For example: You have nested test set executions that in turn have test. |
Context element As soon as you restrict the query as described above, to the entities of a package for example, you can specify more precisely which context elements.
Show formatted texts in multiple lines (Version 6.2.1 and higher)
Select the option if you want to display columns (e.g. description) in the query on multiple lines.
Tab “Selected Properties”
Use this tab to specify which properties of the element that is subject of the query should be be evaluated. Clicking the plus symbol opens a dialog with which you can choose from all of the elements properties. In addition, you can select all associated elements as specified in the query type including their properties.
The chosen properties will be listed on this tab wth Property name, Column name and Navigation path. Under Column name you can specify the name of the column in the result list.
Do you want to remove a property from the query? Go to the property you want to delete it, then click the Delete icon that appears.
The order of properties determines how the columns are arranged in the result list. You can change their order quite easily, just drag them to the desired position.
Tab “Filter”
On the Filter tab, you can filter the data to be shown according to different criteria. Click the plus symbol to create a new filter. Parts of the filters which can be edited, appear in color and underlined. Simply click an entry to edit them.
Property Filter
The query will only display results that match the filter set. For example, you can define that only elements that are in a certain state should be displayed.
Assigned Project Staff Member
If you select this filter, the query will only display the elements to which the logged in user is assigned.
Project Staff Member By Group (version 7.3 and higher)
Use the filter in queries whose query type is set to Project User. If you select this filter, the query will display only the project members assigned to a specific project group. You specify the project group in the configuration.
Editor
In this filter you can set that editor/creator are displayed.
Detail Filter
Use this to limit the number of results of a detail query. For example, if you want to see which requirements have no test cases or a certain number of test cases, use this filter.
Current Project Staff Member
Edit filter and detail filter
You can use filters to restrict the elements to be evaluated according to criteria. Editable areas of the filter are underlined. After clicking on navigation path, the filterable elements are offered to you. Queries provide the following filters:
Property Filter
The filter expression is composed of:
| select a navigation path | Specify here for which element the filter is to apply. | ||||||||||||
| select a property | Specify here which property is to be filtered. | ||||||||||||
| select an operator |
|
||||||||||||
| enter a value | Enter a value. Values cannot be selected. You must enter the values manually. Numbers and text are possible, depending on the selected property. |
Assigned Project Staff Member
If you have selected under Entity Assigned project team member for the requirement or Assigned project team member for the test case in the query type, you can filter the query by user.
Project Staff Member By Group
If you use a query type Project members in a query, the filter can be used to display the result list of the query regarding the project members of a specific group.
Editor
If you have selected under Entity Assigned project team member for the requirement or Assigned project team member for the test case in the query type, you can filter the query by user. The filter expression consists of:
| select a navigation path | Specify here for which element the filter is to apply. |
| select editing kind | Since the agent who created the element does not necessarily have to be the one who further processes the element, you can specify here which agent is meant: The agent who created the element or who changed the element. |
Detail filter
Queries can also be filtered by a certain number of elements. For example, if you want to see which requirements have no test cases or a certain number of test cases, use this filter. The filter expression is made up of
select an operator
| = | displays the data that is identical to the value |
| != | displays the data that do not correspond to the specified value |
| < | displays the data whose value is smaller |
| > | displays the data whose value is greater |
| <= | displays the data whose value is less than or equal to |
| >= | displays the data whose value is greater than or equal to |
enter a value Enter a number.
If you want to combine multiple filters, click the button with the parentheses. A new filter is then added and connected to the existing filter terms with an underlined “AND”. Clicking AND lets you switch between “AND” and “OR”.
To remove a filter, click the red Delete symbol and then the delete icon on the filter to be removed.
Tab “Detail Query Properties”
This tab apears only in the dialog, if a detail query exists within the query type that the query is based on. It has the same options as the “Properties” tab.
Tab “Detail Filter”
This tab apears only in the dialog, if a detail query exists within the query type that the query is based on. It has the same options as the “Filter” tab.
Tab “Settings” (version 8.6 and higher)
Text properties
Show formatted texts in multiple lines (from version 6.2.1) Select this option if columns (e.g. description) in the query are to be displayed in multiple lines.
Row numbers
Show row numbers (from version 8.4.) Select this option if the individual lines in the query are to be numbered automatically.
Grid Paging (from version 8.6.)
Here you can set how many results should be displayed initially when opening the query. This function is only available in the web client.
Activated If only a certain number of results should be displayed, set the value to Activated and enter the number behind Elements per page. If there are more elements, they will be distributed to other pages.
Deactivated If all results of the query are to be displayed, set the value to Deactivated.
Default If you want to adopt the setting from the project, set the value to Default.
Elements per page Here you specify the number of elements to be displayed on a page. If the results list exceeds the number specified here, they will be displayed on the following pages. In the lower section of the query, you can see how many pages there are and can navigate through the pages by clicking on them.
Tab “Commands & patterns”
Here you define commands and patterns, which you can then use from the query to create elements.