Create and edit stereotypes
In objectiF RM, a stereotype tells you that elements and relationships belong to a particular element type (entity). For example, a requirement is assigned the stereotype “Requirement” when it is created. If you create a class instead, it gets the stereotype “Class” and so on. Some of the stereotypes in objectiF RM already have subordinate stereotypes, such as Requirement, which you can extend with your own.
Each stereotype can have properties that you can enhance or customize with your own. Properties that you enhance are automatically displayed in the form. So that new properties can also be displayed and edited using a form, you must create a new form for the stereotype and include the new properties there.

In the editing dialog of an element, the properties are displayed in the Further Properties tab.

Create new stereotype
You create a new stereotype if you need elements in your project that objectiF RM does not offer. These elements are created as artifacts or artifact types. Otherwise, you can use the existing stereotypes and, if necessary, enhance them with additional (sub)stereotypes. Elements, such as requirements with different characteristics, can then be differentiated in the editing dialog.
- Open the window Stereotypes via the eye by clicking Show Stereotypes.
- Navigate to the stereotype you want to expand.
- Call the context menu command Create/ Create Stereotype on the stereotype.

- Enter a name.
- Define properties via the Property Types and Reference Property Types tabs and the identifier pattern using the Identifier tab.
If the same properties apply to all elements of a type, you do not have to enter anything here, since properties and so on are passed on to the lower-level stereotypes. Only if different properties are to apply to the stereotype, or if the identifier requires a different pattern, enter the different properties, and so on, in the corresponding tab pages.

- Confirm your entries with OK.
Create new property
Newly created properties for an existing stereotype are displayed in the editing dialog on the Further Properties tab of the relevant element.
- Call the context menu command Properties on the stereotype.

- On the Property Types tab, click the plus button on the right side of the dialog.
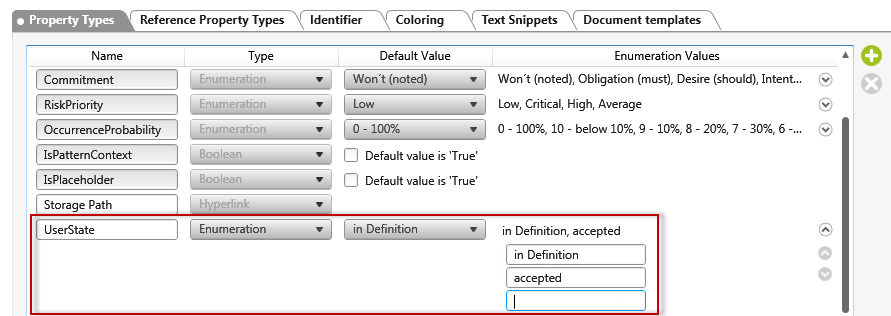
A new line is inserted under the existing properties.
- Enter the property name under Name. Under Type, use the dropdown menu to specify the property types and, if necessary, the corresponding values.
Note that you cannot change the name and property type after you have saved. Property values can also be changed later.
- Then save the changes with OK.
Extending an existing property
If you want to work with other properties and values in your project, you can adapt them to your needs or create new ones.

- Open Stereotypes window via the eye by clicking Show Stereotypes.
- In the window, navigate to the stereotype that you want to change or enhance.
- Call the context menu command Properties on the stereotype.
- On the Property Types tab, click the small arrow button behind the property you want to change.

You cannot delete or change the name of properties that you have not created yourself (that is, properties that are delivered with the tool). However, you can add values to it, change the default value, or change the position of the property values.
- To do this, click on the entry in the Enumeration Values or Default Value column to expand the list. Overwrite a value with the new name.
If you want to add a value, enter the new value in the New enumeration value field. - Save with OK.
Set default value for a property
If you have created a property that has more than one value, you can set a default value for the property. When you create a new item, the default value is already selected and only needs to be changed if the value differs from the default value.
- Open the properties dialog of a stereotype from the Properties context menu.
- On the Property Types tab page, under Default Value, select the property that is to be preselected by default in the editing dialog.
- Save with OK.

Generate new identifier
Most elements in objectiF RM have an identifier that is automatically generated according to a predefined pattern when created. In some cases it can happen – e.g. through an import – that elements of a type have different identifiers.

To ensure that all elements have a uniform identifier, regenerate the identifier.
- Open Stereotypes window via the eye by clicking Show Stereotypes.
- In the window, navigate to the stereotype that you want to change or enhance.
- Call the context menu command Properties on the stereotype.
- Switch to the Identifier tab.
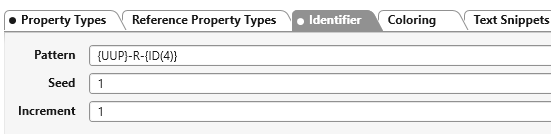
- The identifier consists of these three values: Pattern, start value, counting steps.
Permissible characters for the award of patterns
| Platzhalter | Bedeutung |
|---|---|
| {SYSID} | project id |
| {USRID} | Id of the logged on user |
| {GUID} | ID of the GUID |
| {W} | calendar week |
| {ID} | Generated ID when creating an element |
| {ID(6)} | Generated ID when creating an element with 6 characters, e.g. 000012 |
| {UID} | UID of the created element. If you define the placeholder in an organization, the UID consists of the first five characters of the organization name, the ID of the organization, and the counting step, for example, Organ-61443-000003. If you define the placeholder in a project, the UID consists of the short identifier of the project name, the ID of the project, and the counting step, for example, P-61443-000003. |
| {SYSTEM} | Project name |
| {USER} | Login |
| {UUP} | Short identifier of the project |
| {YYYY} | Year, e.g. 2016 |
| {MM} | Month, e.g. May, Nov, Dec etc. |
| {M} | Month in numbers, e.g. 05,11,12 etc. |
| {DD} | Weekday, e.g. Mon, Tue, Wed etc. |
| {D} | Localized day, e.g. 05, 21, 30 etc. |
| {HH} | Hour in 24 hour format, e.g. 23.00 |
| {hh} | Hour in 12 hour format, e.g. 11.00 (for 23.00) |
| {T} | AM / PM for hour |
| {mm} | Minute, e.g. 05.54 etc. |
| {tt} | Date as tick |
| {ss} | Second, e.g. 05,54 etc. |
Examples
| Muster | Generated identifier |
|---|---|
| {UUP}-REQ-{ID(5)} | SWA-REQ-00008 |
| REQ_{UID} from {D.M.YYYY HH:mm} | REQ_ SWA#103:000009 from 01.08.2012 10:23 |
| Requirement {UID} | Requirement SWA#103:000010 |
| Test on {YYYY-M-D} %{GUID}% | Test on 2012-08-01 %fb735bca-dcd0-4a04-966e-40ba6144e44f% |
| MyReq#{SYSID}-{ID(5)} ({USRID}@{UUP}) | MyReq#103-00013 (17376@SWA) |
| {USER}:{UUP}-{SYSID}-{ID} | mydomain\user.name:SWA-103-14 |
- Click OK.
- Select the stereotype in the list again and choose the command Reallocate Identifier from the context menu.

Since this action cannot be undone, you will be asked whether a new identifier should be generated for all of them.
- Confirm with Yes.
Once the pattern of the identifier has been changed, all existing and new elements are equipped with an identifier according to the new pattern.
Deleting stereotypes and properties
You can delete stereotypes and properties that you have created yourself.
- Open the properties dialog of a stereotype from the Properties context menu.
- On the Property Types tab, select the property that you want to delete and click the Delete button.
