Dialog “Edit Views”
This dialog allows you to define what is to be displayed in the view.
Existing views can also be modified at a later stage, for example by changing the name or adding or removing further columns.
The dialog can be opened:
- via the context menu of a package by clicking on the command Create other/ View…
- by double-clicking on an existing view or via the context menu of a view with the command Edit
The dialog

Type Select the desired view type from the dropdown menu.
Name Give your view an appropriate name.
Planning context, Context element Here you can concretize the query context, depending on the type at hand, e.g. by coupling the area that the view shows to a particular activity and sub-activity.
Icon (version 6.4 and higher) By clicking you can assign another icon to the view.
Workload unit (Shown when it is an activity view.) Here you can set a unit for the effort, regardless of what is selected in the activity. This is used, for example, if you display the column Workload unit for a project view. If the units between activity and view do not match, the effort is converted accordingly.
Time unit (Shown if it is an activity view.) Here you can set a time unit, independent of the entered activity duration. This is used, for example, if you display the column Time unit for a project view. If the units between activity and view do not match, the duration is converted accordingly.

Example: An activity has a duration of 80 hours and an effort of 50 person-days. Since the Workload unit Man-weeks and the Time unit Weeks were selected in the view, the workload and duration are converted accordingly. So you see in the columns a duration of 16 weeks and an annual workload of 10.
View Configuration
Use this tab to specify the properties to be displayed in the view. To do this, click on the plus button and select the corresponding properties from the subsequent dialog.
In most views, you can display properties for different element types. If you have selected such a view type, an additional area is displayed on the left side, which shows the child elements. select an element type, click on the Plus button and select the corresponding properties from the subsequent dialog.
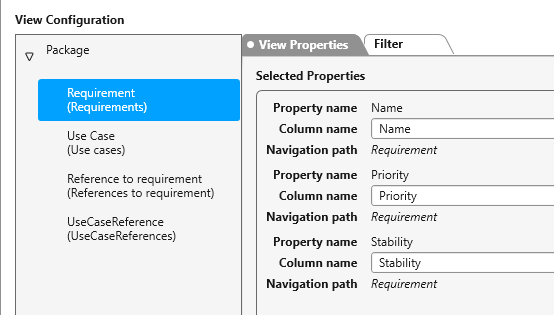
Expand the topmost entry or select an element type and then click on the Plus button on the right. Which properties are displayed depends on which element is selected on the left.
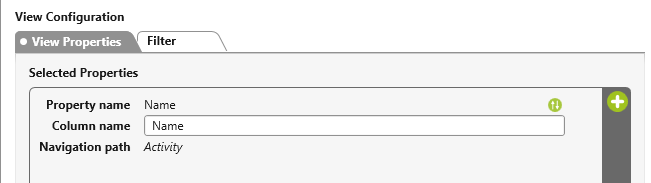
Tab “View Properties”
The selected properties are listed with the Property name, Column name and Navigation path. Under Column name you can determine the name that the column in the opened view should carry.
If you want to delete a property from a view, move your mouse over the property to be deleted and click on the Delete button.
The order in which the properties are listed determines the order of the columns in the view. You can change this by highlighting the property and moving it to the desired position using the drag & drop function.
Tab “Context Elements“
The tab is displayed if you have selected backlog views of the type Requirements scheduling, Requirements backlog or Domain Backlog in projects, as well as views of the type Project plan.
Project plans, multi-project plans, activity plans
Possible context elements for project plans are activities. Activities that you specify under Sources using the Plus button are then displayed in the view. If the selected activities are collective activities, the subordinate activities are also displayed. When creating a multi project plan (only possible in organizations) you can select individual projects or, from version 6.4, you specify an organization as source if you want to see all projects in the view.
Backlog views
If you are in a backlog view instead, use this tab to specify the packages whose contents are to be displayed in the view. Which packages you add here depends on which packages you want to see in the view. A click on the Plus button opens a dialog in which all possible packages of a project are offered for selection.
Packages that you add under Backlogs are shown on the left side of the view. Packages that you add under Target Backlog appear on the right side.
Hierarchical If you check this option, all subordinate packages of the selected package are also displayed in the backlog view.
Simply click on the Delete button if you would like to delete a context element from the view.
Tab “Filter”
On the Filter tab you can sort the information that needs to be displayed according to criteria. By clicking on the Plus button you can add another filter. Editable areas of the filter are indicated by color and are underlined. Click on an entry in order to edit it. Click on the button with the two brackets if you would like to connect several filters. Once a new filter is added it will be connected to existing filters by an “AND”. By clicking on an “AND” you can switch between “AND” and “OR”.
Click on the Delete button and then on the relevant filter in order to delete it.
Tab “Project Plan”
The tab is displayed if you have selected Activity plan, Multi project plan, Project plan or Project plan with staff workload under View Type. In these views, the activities are additionally displayed in a Gantt chart as bars. You can set labels for the individual activity types. The labels can be displayed on the left, right or in the middle of the bar by simply selecting the desired property from the drop-down menu. If you want to remove labels, select the value empty from the drop-down menu.
Show critical path Select this option if you want the critical path to be displayed in the view. Critical activities are activities that do not go according to plan. The icon of these activities is highlighted in red and the name is displayed in bold.
![]() The Reset to default value button removes all settings that have been set.
The Reset to default value button removes all settings that have been set.