
Jira – Import and export requirements
objectiF RM provides an interface to Atlassian Jira that allows you to import issues into a project or export requirements back to Jira as issues. To do this, you create a configuration to connect to a project in Jira. In another configuration, you define which element types are to be transferred and which properties are to be taken into account.
In addition, you can create a custom property of the Paragraph type in Jira, which is used to store a hyperlink to the respective elements when exporting to Jira. Users in Jira can use this hyperlink to access an element via the objectiF RM Web Client. If you want to import the link to the Jira issue into objectiF RM instead, define a custom property of the Hyperlink type on the Requirement stereotype.
If an issue in Jira has so-called Link issues or Child issues, these can also be imported into an objectiF RM project. Link issues are transferred automatically if they exist in Jira. The transfer of Child issues must be configured in the synchronization dialog.
In objectiF RM, you can define events for state changes that are executed after an import or export has been completed.
If requirement references in objectiF RM are located in the same package as the requirement itself, the requirement is taken into account during import/export. If the requirement references are located in a different package, the requirement is not taken into account, even if it is to be transferred according to the configuration.
In addition, a command for import or export can be defined for the topic bar, or a task for import or export can be defined in the Task Manager.
Add configuration
To import and export Jira stories, you must create a configuration to connect to Jira. To do this, you need the Jira credentials (web address, username, and password). You also need a token, which you generate directly in Jira.
- Within a project, switch to the context-specific menu and select the Project → Settings → Configure interfaces command.
- In the Interface Configurations view, click the green Plus button and select Create configuration for Jira.
- In the subsequent dialog, enter the connection data for the Jira system and specify the package in which all Jira stories will be created during an import. When exporting, the elements located in the package are transferred to Jira.
Alternatively, a query can be specified for the export. If you also want to transfer documents assigned to the Jira stories, specify a target directory.
- Then click the […] button next to Jira Project and select a project.
objectiF RM connects to the specified Jira system and displays the projects you can access in the subsequent selection dialog. - Select a project and confirm with OK.
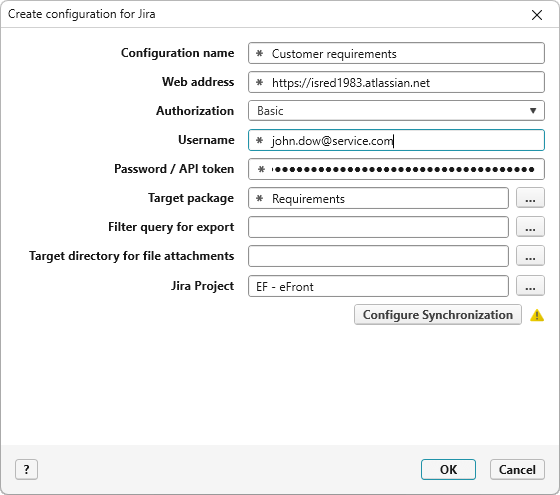
- Now click the Configure synchronization button. You can also save the configuration and configure the synchronization settings at a later time.
Configure synchronization
To ensure that it is clear what is to be transferred during import/export, you must map the element types and properties. In addition, you can specify here whether the configuration applies to import, export, or both. You can perform the mapping for different types.
- In the Create configuration for Jira dialog, click the Configure Synchronization button. A dialog opens in which you can specify which element types and properties are to be taken into account during export/import.
- Using the drop-down menu next to Type, select the Jira type that you want to import or export.
- Under Stereotype, specify the type to be used when new elements are imported into and created in objectiF RM. During an export, elements of the specified stereotype are then exported to Jira and assigned the selected Jira type.
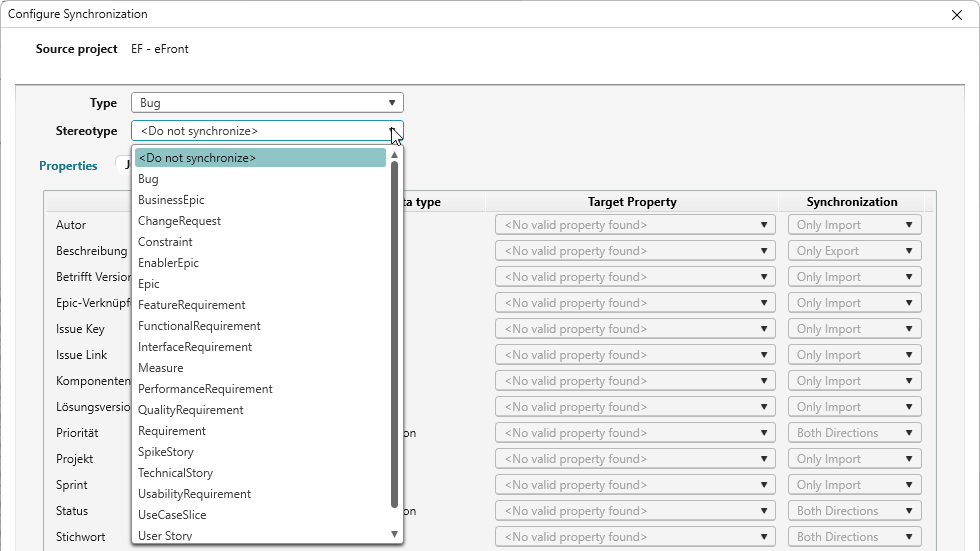
As soon as the mapping has been completed, the list of properties is enabled. These are properties that were found for the selected Jira type.
Green rows have already been mapped. The mapping was performed automatically for the Name, Content, Current state, and Priority properties.
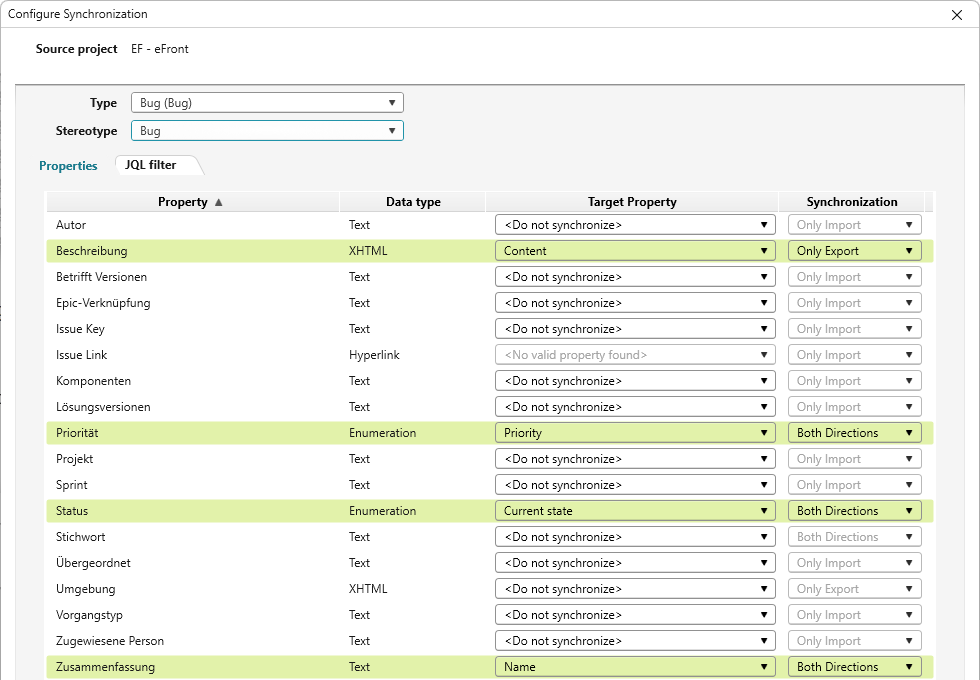
If properties are not mapped, they have the value
- Specify the properties that you want to transfer. If you have selected properties of the Enumeration data type, do not forget to map the values under Enumeration values. The same applies here: Green rows have already been mapped. The mapping is performed automatically if the property values in Jira and objectiF RM have identical names.
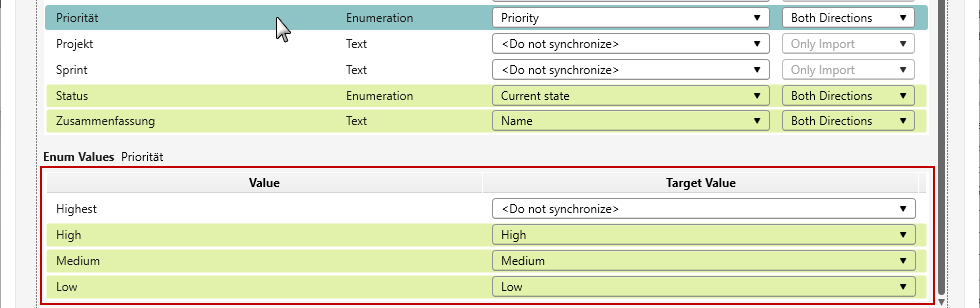
- Finally, use the Synchronization column to specify for each property whether the transfer of the properties is to be taken into account during import, export, or always. Both Directions is set by default.
If you want to transfer additional element types, go to the next section before saving the dialog. - If you have configured only one element type, save the settings with OK.
Map additional element types
You can specify in a configuration that different types are to be taken into account during import/export. Please note that types that are already in use cannot be mapped to another type. If you still want to do this, you must create another configuration in the Interface Configurations view.
- Open the Configure synchronization dialog by clicking the Configure Synchronization button in the configuration dialog.
When you open the drop-down menu next to Type, you can see at a glance which element types have already been mapped. Once a mapping has been assigned, the selected objectiF RM stereotype is displayed in parentheses next to the Jira type. Based on the following image, these are Bug and Sub-Task. The Epic, Story, and Task types can still be mapped.
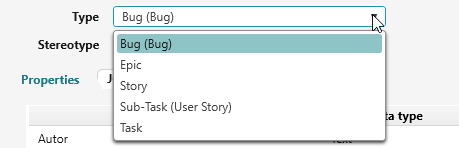
- Under Type, select a Jira type that has not yet been used.
- Proceed in the same way as described in the previous section.
- Finally, save your configuration with OK.
Import Issues
In Jira, issues can have one or more Link issues. When such an issue is imported, the assigned Link issues are also imported, provided they are located in the same project. As soon as you open the issue dialog in objectiF RM, the Link issues are listed under Dependent Requirements on the tab Dependency.
Import and export Child issues
In addition to Link issues, an issue can also have Child issues. When such an issue is imported, its Child issues are not imported by default. However, you can map them to Sub-Task in the synchronization dialog. (Depending on the language set in Jira, the spelling may vary.)

In objectiF RM, the issue and Child issue are then imported as separate elements. They are not connected to each other and can therefore be imported and exported independently of each other.
Import/export Jira stories from a configuration
If you now want to import or export the Jira stories, switch to the context-specific menu in the project and select the Project → Synchronize Jira Projects command. In the dialog that opens, select a configuration and click Import or Export.
Alternatively, the import can also be initiated via the Interface Configurations view. Select a configuration in the view and click the Import or Export command in the context menu.
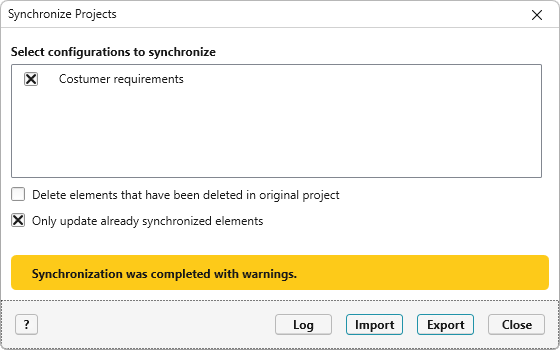
The import/export always concludes with a message.
You can use the Log button to see which elements were transferred and which were not.
Import/export Jira stories from multiple configurations
If you want to initiate the import for all configurations at the same time, switch to the context-specific menu in the project and select the Project → Synchronize Jira Projects command. In the dialog that opens, select all configurations and click Import or Export.
Create a Web Link property
In objectiF RM, users can create a hyperlink to almost any element. This link allows a user to quickly access an element via the Web Client. When exporting to Jira, the individual hyperlinks can also be transferred if a custom property is created in the Jira project. Users in Jira can then click the link to access the element, provided they have been created as users in the objectiF RM project.
Depending on whether the project is based on a Team-managed or a Company-managed template, you must proceed differently.
Project (Team-managed)
- Connect to your Jira system and open the project.
- Open the project settings on the left-hand side.
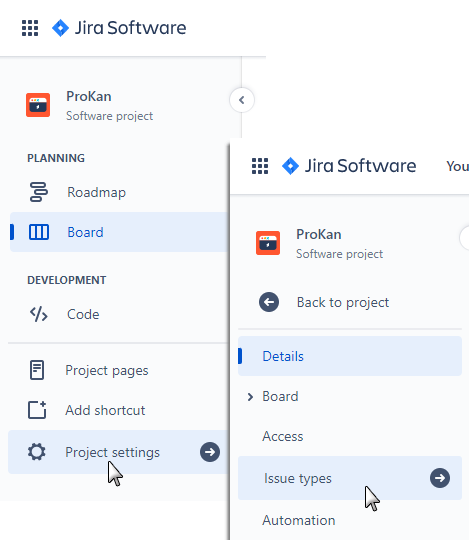
- Click Issue types on the left and select a type, e.g., Epic.
- On the right-hand side, under Fields, click Paragraph.
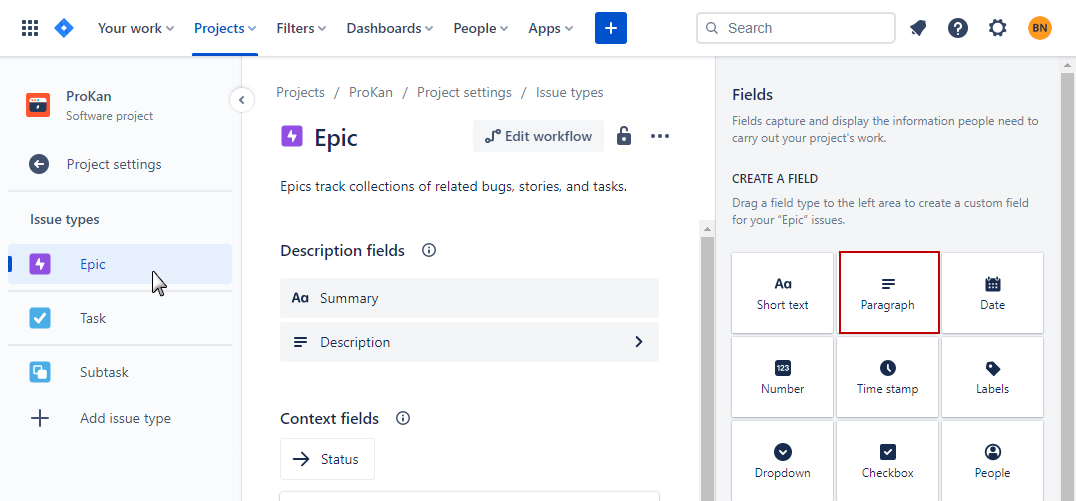
- Name the property and save it.
Once the property has been created, you can select it in the synchronization dialog and map it.
Project (Company-managed)
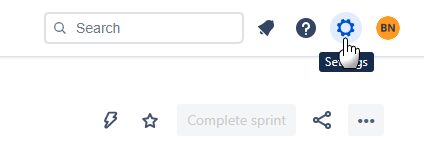
- Connect to your Jira system and open the settings in the upper-right corner.
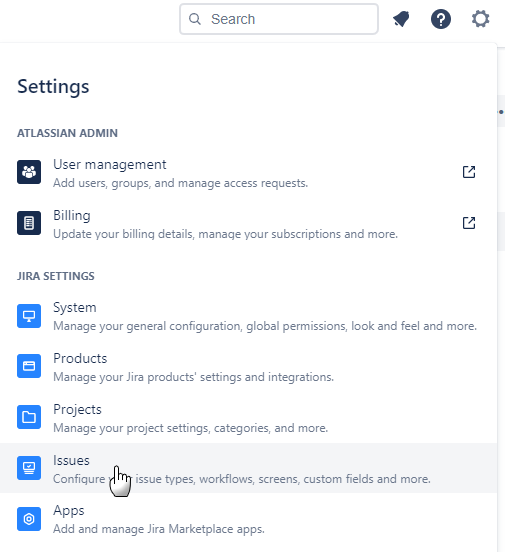
- In the settings, click Issues.
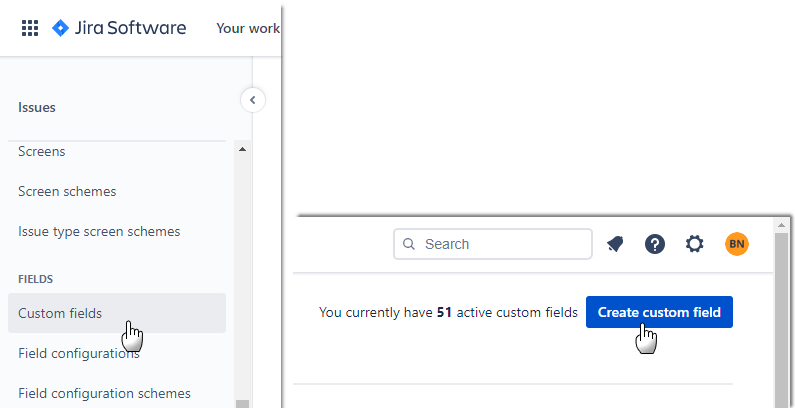
- On the left-hand side, scroll down to the Custom fields entry.
- Create a new property by clicking Create custom field in the upper-left corner.
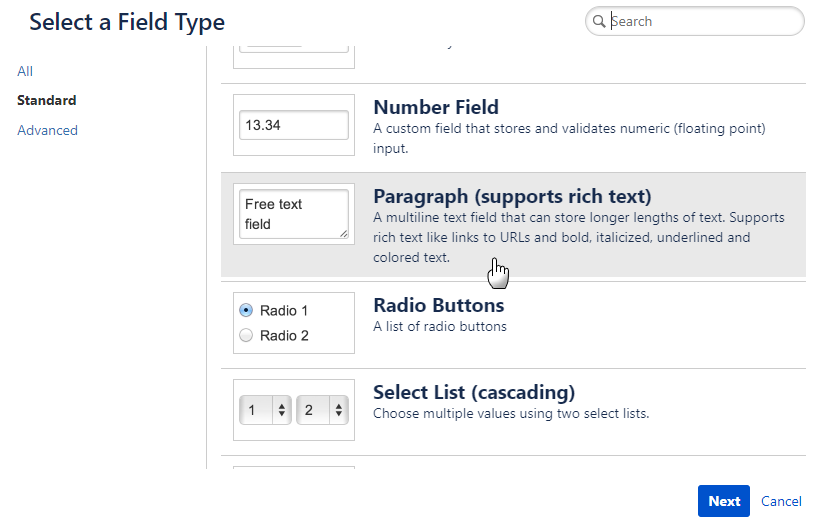
- In the subsequent dialog, select Paragraph (supports rich text) by first clicking the field and then clicking Next.
- Name the property and save it by clicking Create.
- After creating it, select Field configurations on the left-hand side and click Default Field Configuration in the middle of the screen.
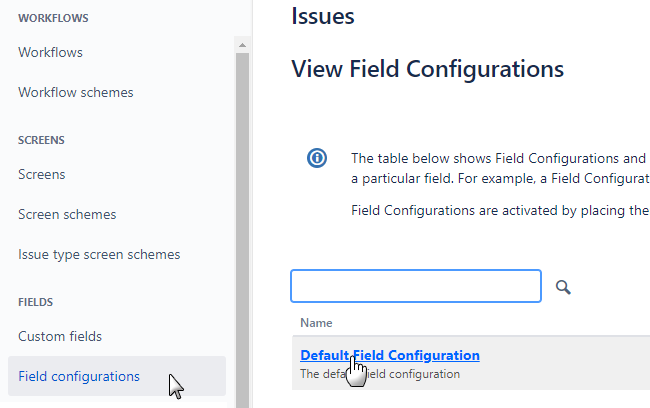
The page that opens displays all created properties.
- Enter the property you just created in the search field.
- Select it and click Renderers on the right.
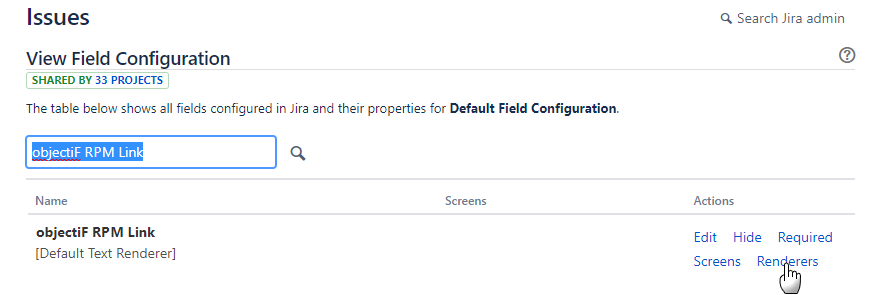
- Change the selected type to Wiki Style Renderer and confirm by clicking Update.
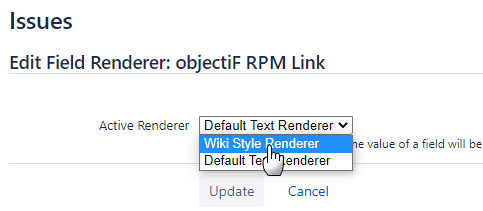
You are returned to the Issues page.
- Select the property again and click Screens on the right.
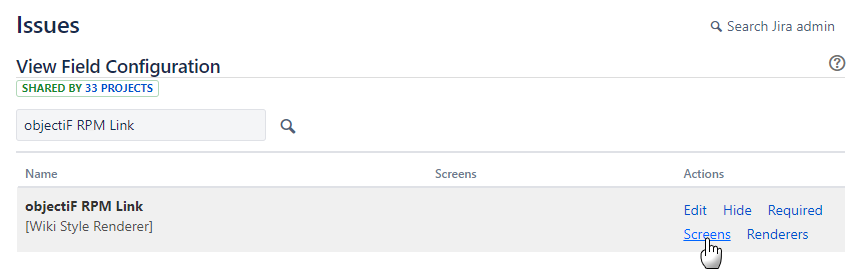
- On the following page, enter the Jira project in the search field.
- Select it and click Update.
Once the property has been created, you can map it in the synchronization dialog.