
Dialog for ‘Edit Settings’
In this dialog, you can configure the tool’s settings in regard to region, language, work availability, public holidays and speech recognition.
Only system administrators can make changes to cross-project and organization-wide settings.
Open the dialog:
- Open the system settings from the vertical toolbar by clicking the System → Settings → General Settings.
The Dialog
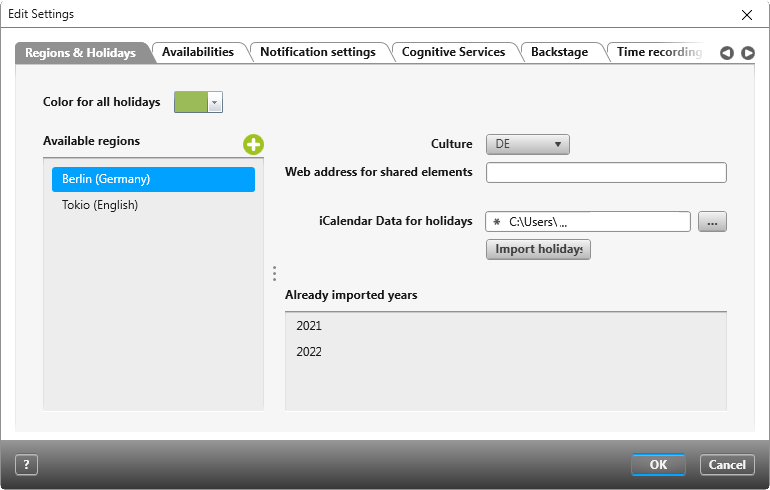
Tab “Regions & Holidays”
Here you specify which regions (e.g. federal states, countries etc.) and holidays are displayed in the project and employee calendar.
Color for all holidays Select the color to be used to mark public holidays in calendars.
Available regions Use the plus button to create regions. Double-click to enter the editing mode and adjust the name of the new entry. A click on the red delete button removes the corresponding entry from the list.
Culture Here you can assign a language to the region. Only German and English are available.
You can set regions for individual employees. This means that when they receive an automated email, it will either be in German or English according to the specified region and language.
Web address for shared elements Here you can specify a web address (web client) for (each) created region, which is to be used when e-mails are sent according to settings for state machines. This gives you the possibility to offer separate web service addresses for different locations.
iCalendar Data for holidays Holidays are imported via calendar files. Select the desired file (*.ics). In the subsequent dialog you can specify in detail which public holidays are relevant for your organization. You can use the Import holidays command to import the selected entries.
Already imported years Shows which public holidays are already available for the selected region in your organization. As of version 7.8, the imported holidays can be transferred to the employee and project calendars.
Tab “Availabilities”
On the Availabilities tab page, you define the typical types of working time and non-working time for your organization/project, such as company holidays, training courses, and so on. If you later enter an internal training course in the project and employee calendar, for example, this is highlighted in the calendar.
Types of availability Clicking on the plus sign adds a new entry to the list. Double-click on the new entry to enter the editing mode and change its name. A click on the red delete button removes the corresponding entry from the list.
Color For the selected entry, select the color that is to be used to indicate this type of availability in calendars. Also specify whether the day is a working day or a non-working day.
Description If required, you can make further specifications about the type of availability here.
Tab “Notification settings”
Here you can specify for the entire system that users must receive collective e-mails about changes.
ScopeThe scope determines for which user groups the settings should apply.
Select User specific if the user can decide and set whether he wants to receive collective e-mails or not.
Select Standard for new employees if new employees who are added to the system are to receive collective e-mails. For these employees, the setting made here applies until they make their own settings.
Select Mandatory for all employees if you want to specify that your employees should receive collective e-mails. Even if employees have not set a notification for themselves, they will still receive summaries when changes are made.
General settings
Generate links for elements Check the option if a link to the item should be included in the attachment of the email for the desktop client. The option is enabled by default.
Generate hyperlinks for elements Check the option if a link to the element should be included in the e-mail for the web client. The option is enabled by default.
Forward notifications directly as mail Check the option if an e-mail should also be sent immediately after a system message is sent. This option is also enabled by default.
Settings for summary mails
Interval Use the drop-down menu to select an interval. You can set Never, Weekly, Daily, Twice a day, Three times a day.
When the collection mail is sent depends on what the working hours of the particular user are. If no working hours are defined for the user, then the collection mails will be sent between 8 am to 4 pm. If the setting is Twice a day, the first summary mail will be sent at 8.30 am and the second at 3.30 pm.
If working hours are set for the user, the sending of the e-mail will be done as follows:
Weekly Sending is done on the last working day of the week half an hour before the end of work. As a rule, this will be a Friday. If you have set the interval Weekly, mark each weekday under Weekdays, as the last working day of the week can be set differently for users.
Daily Sending is done once on each set day of the week. The summary mail is sent half an hour before the end of work.
Twice a day Sending is done twice on each set working day. The first group mail is sent half an hour after the start of work and the second half an hour before the end of work.
Three times a day Sending is done three times on each set working day. The first summary mail is sent half an hour after the start of work, the second one arrives after half the working time and the third collective mail is sent half an hour before the end of work.
Weekdays Select the days of the week when users should receive messages.
Summary type Use this to determine whether all messages should be sent or only the unread ones.
Send the summary mail only when system notifications are available If this option is checked, the user will only receive a collective mail if system messages have been sent in the period of the set interval.
Generate replylinks Check the option if reply links are to be generated in the e-mail.
Tab “Cognitive Services“
All of objectiF RPM’s AI-based features are configured on this tab. These include speech recognition, AI assistants, and text-based quality checking.
AI Assistant and Text-Based Quality Check (Version 9.1 and later)
To use the AI features, you must set up Docker containers. microTOOL provides a Docker image that allows you to access an AI database. To use the full range of AI features, you will also need a cloud account (e.g., with Google or OpenAI). Further information is available upon request in a separate document.
Enable Cognitive Services for AI Assistants and Quality Check
This option enables the settings for text-based quality checking and AI assistants.
Address Enter the address of the server on which the Docker container is running here.
Port Enter the port to be used for communication with the server.
Text-Based Quality Check
With the text-based quality check, you can check requirements for simple quality criteria:
- Whether the requirement name is phrased as a complete sentence
- Length of the requirement name
- Whether the requirement name is phrased in the active voice
- Whether the name contains general, vague quantity or time specifications
- Does the name contain nouns whose meaning is ambiguous?
as well as complex quality criteria:
- Spelling and grammar of the requirement wording
- Are there similarities to existing requirements?
- Are there contradictions with existing requirements?
- Clarity of the requirement wording
Set Up Database Transfers all requests to the Docker container’s AI database. The output confirms that the database has been set up. Requests created after setup are automatically added to the database.
Update Service Data Updates the connection to the Docker container following configuration changes. The container must be running for the API information (service, model, and API key) to be transferred to the Docker container.
Service Use the dropdown menu to select a platform to be used for text-based quality checking of requirements. objectiF RPM supports the Vertex AI platform from Google Cloud and OpenAI. If you do not have a cloud account or do not wish to use one, only a limited set of features will be available to you.
AI functions with a specified platform:
- Checking the wording of the requirement name (sentence structure, length)
- Checking the spelling and grammar of the requirement wording
- Checking for similarity to existing requirements
- Checking for contradictions with existing requirements
- Checking the clarity of the requirement wording
AI functions without a specified platform:
- Checking the phrasing of the requirement name to ensure it is in sentence form and active voice
- Checking the length of the requirement name
- Checking for general, imprecise quantities or time specifications in the requirement name
- Checking for nouns in the requirement name whose meaning is ambiguous
- Checking for similarity to other requirements in terms of name and description
Please note that when using Vertex AI and OpenAI, the data you enter is forwarded to the respective companies for processing.
Vertex AI Configuration
Vertex AI is an AI platform provided by Google Cloud. You’ll need a Google Cloud account and a set-up project.
Project ID Enter the ID of your Google Cloud project here.
Service Region Enter the service region of your Google Cloud project here. You can find the region in the Google Cloud dashboard under “Region.”
Authentication File Use the […] button to select the downloaded authentication file. The file contains the information required for the API call. (To create the authentication file, select the project in Google Cloud and create a new service account for that project. Then, generate a *.json file from the key and save it.)
OpenAI Configuration
You can use the OpenAI platform provided by OpenAI. Here, too, you’ll need a Cloud account. Enter the following information from your account:
Model Specify the model you want to use. By default, the dropdown menu offers the different models. Your cloud account offers additional models beyond those listed above. If you want to use a different model, simply enter the model name in the field. The model configured in your cloud account must match the model specified here.
API Key Copy or enter your API key here. The key is required for authentication.
AI Assistants (OpenAI) / Azure OpenAI (version 9.1 and later)
With AI Assistants, you can generate new or refined elements based on existing ones and import them into the project.
API URL Enter the API address.
API Key Copy or enter the API key here. The key is required for authentication.
Model Specify the model you want to use here. The dropdown menu offers the gpt-4o and gpt-4 models by default. The model configured in your cloud account must match the model specified here. Your cloud account offers additional models beyond those mentioned above. If you want to use a different model, simply enter the model name in the field.
API Version (to be entered only when using OpenAI) Enter the model version configured in your cloud account here. The version must match the one stored in the account.
If text-based quality checking is set up, you can open the AI Analysis window by clicking the Show AI Analysis icon in the vertical toolbar. Once you have configured the AI assistants, you can run them in the project using a command.
Speech Recognition and Voice Assistant
Enable Speech Recognition Check this option to enable speech recognition for your projects. Speech recognition will then be available in all RTF editors and accessible via an icon. If you no longer wish to offer speech recognition, uncheck this option.
Select Service Provider: Use the dropdown menu to select Microsoft Azure as the service provider.
Select Default Language Specify the language you want to be recognized via the microphone. By default, you can select de-DE (German), en-US (U.S. English), and en-GB (British English) from the dropdown menu. If you want to support another language, simply type it into the dropdown field. (You can find the abbreviations for additional languages on the Microsoft Azure page under “Speech Input” or “Speech Recognition.”)
Enter API Key: Enter the Microsoft Azure API key. You can generate the key in your Azure account and then paste it here.
Enter Service Region: Enter the location of your Azure account here. You can also find the location in your Azure account.
Enable Voice Assistants
In order to use the voice assistant you will need the container platform docker, which will have to be installed on a Linux server. There you load the docker image and start the container. More detailled information regarding this can be provided in a seperate document upon request.
The voice assistant needs to be configured so that it can recognize which language it will receive as input data. The voice assistant will only be able to recognize the language for which it has been configured.
In order to select the option for the voice assistant, the option for the speech recognition first needs to be activated. By default, the option is not enabled. Upon activation, the fields for Address and Port are also activated for receiving input data.
Address Enter here the address for the server that the docker container will run on.
Port Specify the port which will configured for the server.
Upon activation, the speech assistant will be available to use for all projects and organizations. To use the feature click on the microphone, which can be found in the top right-hand corner next to the project and organization tabs.
Tab “Backstage”
As an administrator, you can specify for users whether the Userboard or a dashboard should be displayed by default when objectiF RPM starts. Individual users can choose for themselves – regardless of the default setting configured here – whether they want to see a dashboard or the Userboard.
Show Userboard Check this option to be the default opening view.
Show Dashboard Check this option if a dashboard should be displayed for users by default. Use the […] button to select a dashboard from an organization.
Tab “Time recording report”
Allow reporting of time recording for all projects As an administrator, this option allows employees working on the current project to open the “Time Tracking Analysis” view. If this option is selected, an employee can open this view type in any project to which they are assigned.
Display a note when entering times on non-working days If this option is enabled, a message will appear when times are entered on a day defined as a non-working day. If the message is confirmed, the entered value will be accepted.
Limit time tracking after month-end If this option is enabled, employees can no longer record or edit times for the previous month. Optionally, you can specify a value that allows time tracking for a certain number of days after the end of the month. To do this, enter the number of days in the field.
Limit time entry to the future If this option is enabled, employees cannot enter times indefinitely into the future.
Optionally, you can specify a number of days for which time entry into the future is still permitted. To do so, enter the number of days in the field.
Tab “Newsfeed”
This option allows users to enable the ‘Newsfeed’ function. The Newsfeed provides a regular stream of events, interesting product information and blog posts, among other things, which keeps users up-to-date with work-related developments. Every user can activate and deactivate the Newsfeed in their notification settings.
Allow users to subscribe to the newsfeed By default, this option is selected. However, deselect it if you wish to deactivate the function. An activated Newsfeed is signified by the megaphone icon in the main red panel in the top-left corner.

Tab „Passwordsettings“
Here, you can configure security-related features, such as two-factor authentication or password policies. You can also set when a password expires or whether users can reset their passwords.
Two-Factor-Authentification
With two-factor authentication, users must identify themselves using two different factors (e.g., password and PIN, password and fingerprint, etc.). To log in to objectiF RPM, users need the password assigned to them and an authorization code generated by an app (e.g., Google Authenticator).
Two-Factor-Authentification is obligatory for everyone Select this option if users must log in to the web client using two-factor authentication.
Password policy
Minimal lenght of passwords By default, the password length is set to 8 characters. Enter the minimum number of characters. You can specify a minimum password length of 4 characters.
Password must contain a number Select this option if the password must contain at least one number.
Password must contain a special character Select this option if the password must contain at least one special character.
Password must contain a upper case and a lower case letter Select this option if the password must contain both uppercase and lowercase letters.
Password must to be different to the password history Select this option if passwords must not be repeated within a specified time period.
Length of time to store the password history in days Specify how long old passwords should be stored so they can be compared with new passwords. The maximum allowed value is 365.
Settings for passwordage
Password expires Specifies the number of days after which a password must be changed. This option allows you to enforce regular password changes.
Maximum password age in days Select the Password expires option to enter the number of days.
Time a password has to be used before changing it again Defines the minimum length of time a password must remain valid before it can be changed. Selecting this option enables the input field for the duration.
Minimum password age in days Select the Time a password has to be used before changing it again option to enter the number of days. The maximum allowed value is 30 days.
Locking the account
Account is locked after specified number of failed login This setting specifies that the account will be locked for further login attempts after a certain number of consecutive failed login attempts. Once the specified limit is reached, the user account is automatically locked. The lock can be lifted by an administrator or automatically lifted after a defined period of time (depending on the system configuration).
Number of failed logins before locking Enter the maximum number of allowed failed attempts here before the account is locked. The minimum number is 1.