Dialog for ‘Edit Project’
In the project properties section, you can edit a project’s name and description. In addition, you can also edit project calculations and see which employees have been requested from other projects.
By default, projects don’t have set states. However, you can create state machines for projects if you want to see the state of a project. A project’s current state is displayed by an icon on the userboard.
Open the dialog:
- In the Backstage menu of a project by selecting Project/ Properties
- In the Backstage menu of a program by selecting Program/ Properties (Version 6.0 and later)
- In the Backstage menu of a portfolio by selecting Portfolio/ Properties (Version 6.0 and later)
The Dialog
Name Here you can view and edit the name of a project.
Short identifier Here you can specify a character string that is to be used when a project ID is generated. (For example, when creating requirements, goals, stakeholders, etc.) The short identifier is the first part (prefix) of an identifier and can consist of a maximum of 6 numbers and/or letters. (e.g. T-R-004)
You can change the short indicator at any time, but elements that have already been created retain their short indicator. If you want to have uniform IDs, generate a new identifier for all elements.
Stereotype Here you can change the stereotype of the project. By default, its steretype will be Project, however, you can change this to Program or Portfolio.
Status (Version 6.0 and later)
Use the drop-down menu to configure the status of the project; your chosen status will only be displayed in the dialog. The possible status values are Preplanning, Open, Finished and Archived. You cannot add to, change or delete these values. If a project is concluded and you no longer wish to change it or have it displayed on the userboard, set its status to Archived. An archived project is not only no longer shown on the userboard, it is also absent from various selection dialogs. However, users with administrator rights can still access and edit archived projects through the Userboard by selecting Customize userboard.
Region Here, select which region the project is based in. To add new regions to the system, go to the Backstage Menu and select Settings/ General Settings/ Regions & Holidays. There is no default region.
Publish for activity references Use this option to publish the project so that, for example, projects in other locations can access it.
Publish as tutorial for all database users If this option is selected, users who do not belong to the project can also view and open the project.
Tab for ‘Description’
Enter here a description.
Tab ‘Variation Configuration’
Enter here variations of the project/ program/ portfolio.
Tab for ‘Requested Staff’
Select one or more staff pools for your project.
Tab for ‘Costs’
Project currency Here you can the currency for which the hourly rates for the project are calculated. You can choose between EUR (Euro), USD (US Dollar), GBP (British Pound) and CHF (Swiss Franc). The currency selected is automatically used as the unit for the hourly rates.
Recorded hourly rates
Here you can enter hourly rates which can apply both to an entire project or for specific time periods. To enter hourly rates for a specific time period, click on the green plus button next to Recorded hourly rates to create an entry. To remove a time interval from the system, click on the red delete button next to its entry.
If you see a warning triangle next to a date, this indicates that there is an overlap of hourly rates which needs to be addressed.
For time interval
From/ To Here, select a time frame for which the hourly rates will apply. You can either click on the blue arrow, which will set the start and end dates to the beginning and end of a given project, or click on the grey arrow in the drop-down menu and manually enter the dates.
Internal rate/ External rate With these two options, you can differentiate between work done internally and externally. Furthermore, if there has been no hourly rate specified for project staff, the value entered here will automatically be applied to their earnings.
Cost categories
In this section you can record all possible additional costs which occur during the course of your project. To enter a category, click on the green plus button next to Recorded cost categories and in the Details section enter a name and description. Additional costs entered in this section can be assigned to individual activities.
Tab for ‘Budgets’ (Version 6.0 and later)
Total budget
A budget is the total amount of money available for the implementation of a project/ program/ portfolio. It is up to you whether you enter an overall budget or divide the overall budget into categories. It is not possible to have multiple budgets whose time intervals overlap.
Click on the Plus button to create a budget. If you have created several budgets, the total sum of the specified budgets is displayed above the input area.
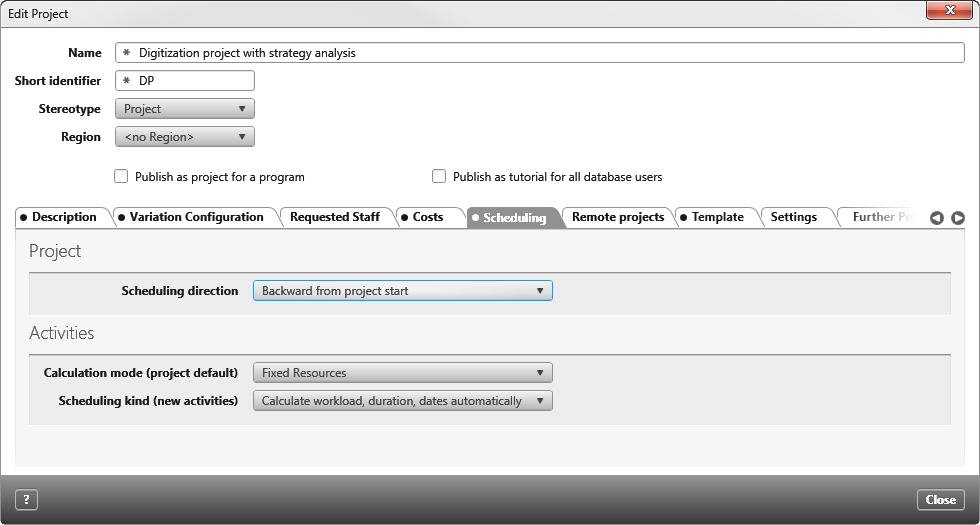
Tab for ‘Scheduling’
Project
Here you choose a scheduling direction for the calculation of the project plan:
Forward from project start Select this option if you have activities that take place one after the other and are to be calculated accordingly. Only activities with fixed dates, as specified in the section for Must start on/ Must end are calculated. Activities with restrictions such as As late as possible are calculated as if the restriction As early as possible has been configured. Starting from the first activity, the start date of the project plan is copied as the start date and the end date is determined from the duration.
Backward from project start Select this option if you want to complete your activities as quickly as possible. If there are conflicts between the individual activities, such as one activity having the configuration As late as possible and a subsequent activity has the restriction As early as possible, both activities are calculated with the restriction As early as possible.
Backward from project end Select this option if you don’t need to finish at any specific time. If conflicts arise between the individual activities, such as one activity having the configuration As late as possible and the subsequent activity having the restriction As early as possible, both activities are calculated with the restriction As late as possible.
Activities
Calculation Mode (project default)
Here you can specify the default setting for calculating activities.
Fixed Duration Select this setting if you don’t want the duration of the activity to change. Even if at a later point you have more employees available or the planned workload changes, the duration of the activity remains the same.
Fixed Workload Select this setting if you don’t want the workload to change and you want to control the duration of activities by adding or removing employees.
Fixed Resources Select this setting if you know the number of available users. Even if the duration or effort of an activity changes later on, the number of employees remains the same.
Scheduling Type (New Activities)
Here you can specify the default setting for calculating new activities. You have the following options: Workload, duration, days fixed, Workload and duration fixed, calculate dates automatically, Calculate workload, duration, dates automatically.
Progress calculation for parent activities (Version 6.4 and later)
In the drop-down menu you can select either Manual input or Calculated. Select Manual if you don’t want the activity scheduling to be done automatically. If this is the case, configure the scheduling through the Progress field of the activity in question.
Tab for ‘Remote projects’
Use the plus button to select local and external projects. You can see if a project is local or external in the list.
Select local project Local projects are projects that are created within your organization. From the list, select the project that you want to address.
Select remote project Remote projects are projects that are located in a different location than the current project. Only remote projects that have been configured correctly will show up in the selection dialog.
Tab for ‘Template’ (Version 6.3 and later)
This tab is only displayed if the project/ portfolio/ program was created from a template of the current system. However, if you create a project based on a project export, the template can no longer be identified and is therefore not displayed.
Created from template This signifies that the project was created using the template displayed here.
Revision Only shown if the project template is a revision of the template shown above.
Date Date when the revision was created.
Description If a description was written when the revision was created, it is displayed here.
Tab for ‘Settings’ (Version 7.0 and later)
Allow deletion of the project (Version 7.5.1 and later)
Select this option if you wish to activate the Delete command for the Backstage Menu. By default, this option is not selected in order to avoid any accidental deletions of projects.
Coloring (up to version 6.4.2 in own tab page)
Default color Here you can select a standard color for the project tile.
Customized color Here you can select a color for the project tile from a color palette.
Documents (Version 7.0 and later)
Check In after the office file is closed. Select this option if you want a checked-out Office file to be returned automatically when it is closed.
Default Font (Version 7.1 and later)
Use the drop-down menu to choose a font type and size. This will be applied to all RTF texts within the project. RTF texts appear in forms and dialogs. The chosen font is also applied to RTF texts in query columns.
ICS Files (Version 7.4 and Later)
Here you can specify and configure what is exported alongside individual requirements and activities. This can include appointment creation dates and descriptions of the requirements and activities you wish to export.
Target Directory Via the […] button, select a directory from your project where the ICS file you wish to export will be stored.
Include participants in the appointment Select this option if you want the ICS file to include the staff members assigned to the corresponding requirements/ activities.
Add assigned files in the attachment Select this option if you want any attachments which have been added to an activity (found in the Output/ Input tab) or requirement (found in the Attachments tab) included in an ICS file to also transferred.
Requirements start date: If it’s requirements you are trying to transfer into a calendar as an ICS file, enter here a user-defined property of either Date or DateTime types. These properties need to be configured in order for the export to be successfully executed.
Requirements end date: As is the case with a requirement’s start date, user-defined properties for Date or DateTime also need to be specified for an end date in order for the export to go through successfully. It’s possible to use the same date for both the start and end date; in the calendar, the event will be shown as taking place over only one day.
Tab for ‘Further Properties’
What you see in this tab depends on the assigned stereotype. If user-defined properties have been created for this stereotype, you can enter these values here.