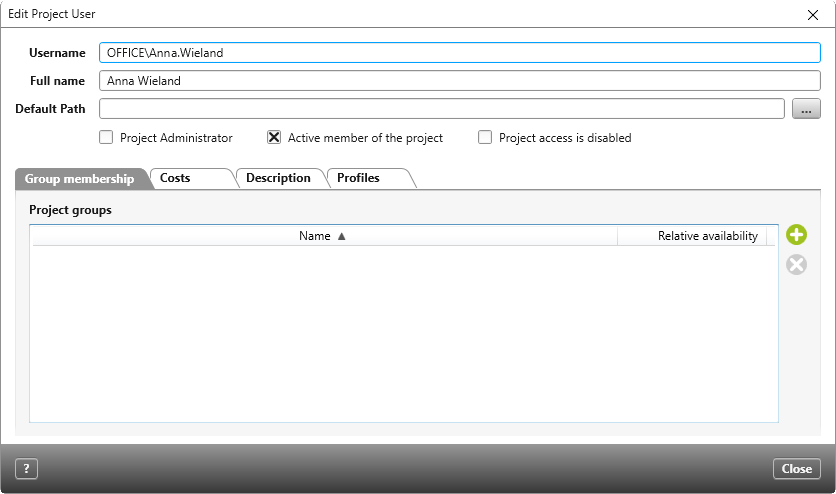
Dialog “Edit Project User”
In this dialog you edit the properties of a project member. For example, you can assign additional rights to the project member, deactivate him or her for the project, or adjust the group membership.
The dialog can be opened:
- in a project, via the view Manage Project Staff, by opening the context menu of a project member and clicking Edit.
The dialog
Username The user name of the employee with whom he or she logs on to the database is displayed here.
Full name The first name and surname of the employee are displayed here.
Default Path Defines the working directory of the employee for the current project. All products that the employee borrows for editing in the context of the project are stored in this directory according to their hierarchical structure and unless you specify otherwise for a product.
Project Administrator Activate this option if the user is to assume the role of a project administrator. A project administrator can assign employees to projects and templates.
Active member of the project By default, each user in the project is an active user. As an active user, a user can open the projects to which he or she is assigned. If the option is deactivated, the user only has access to projects that are declared as tutorial. All other projects to which he is assigned are no longer displayed to the user in the user board, but they remain in the project as project users.
Project access is disabled (Version 6.4 and higher) Check the option to prevent the project team member from continuing to open projects.
View time recording report of other team members (Version 7.2 and higher) As an administrator, you can use this option to specify that the project member can see also the view Time recording report of other team members.
Tab “Group membership”
Here you can see which project groups the employee is assigned to. An employee can be assigned to more than one group. In the Relative availability column, you can specify the percentage of the employee’s availability.
Tab “Costs”
Default Hourly Rates (Internal) from/ Default Hourly Rates (External) from Here you select the hourly rate to be used for the project member.
You specify hourly rates for a project in the project properties. You specify the hourly rate for an employee in the view Edit Organization Staff.
Hourly rates
If you do not require special hourly rates for the project member, ignore this area. In this case, the hourly rates specified for the project or in the organization for the employee are used. If the hourly rate differs from the stored hourly rate, specify the hourly rates and periods to be used for the project employee in this project.
Click on the plus button to create a new hourly rate. If you want to remove hourly rates again, select the hourly rate and click on the Delete button.
A warning triangle before the date indicates that hourly rates overlap. Correct the periods accordingly.
For time interval
From/ To Enter the date for an hourly rate here. Click on the arrow button to select the desired date from the displayed calendar. If you click on the blue button behind the date, the date is set to the end or beginning of the project.
Internal rate / External rate Here you can specify up to two hourly rates for the project employee. The rates entered here overwrite those that you have specified in the organization in the editing dialog of the employee.
Tab “Description”
Here you have room for further notes.
Tab “Profiles” (Version 5.1 and higher)
Here you can see the profiles to which the project member is assigned. You can assign profiles using the plus button.

