Working in diagrams
Open diagrams by double-clicking on their entries or by selecting Show in their context menus.
Create Elements and Relationships
The modelling area has the same structure in all diagrams. On the left-hand side, there is a grey toolbar that you can use to create diagram elements. Hover your mouse over the buttons to reveal what each function is. Elements that you create or insert into diagrams can be linked up with the relationship functions available in the toolbar. When establishing relationships between elements, the modelling wizard will restrict you to only being able to create nodes between elements with correctly corresponding stereotypes.
When you establish relationships between elements, references are created in the editing dialogs of the respective elements. In these editing dialogs it is also possible to remove a respective element from a diagram; this deletes the relationships that element may have had in the diagram, as well as the references that had been created in the editing dialogs of the other, previously related elements. The same applies if you delete elements from the project.
Move Diagram Area
Hold down your mouse button in a diagram to move freely in your desired direction.
Zoom in Diagram
Use the mouse scroll wheel to zoom in and out of the diagram. You can also set the zoom factor by entering a zoom percentage value in the bottom left-hand corner. A click on the 1:1 button restores the diagram to its original size. The Fit Diagram to Screen button scales the diagram to the current window size.

Move Elements
All diagram elements can be dragged and dropped into the desired position. To do this, the Arrow button must be activated in the diagram toolbar.
With the Arrow button selected, moving your cursor over an element will turn the normal arrow into a quadruple arrow. If you want to drag & drop multiple elements simultaneously, hold down the shift key and the left mouse button, and draw a frame around the desired elements. Then, drag & drop one of the selected elements to where you want it; the other selected elements will follow suit.
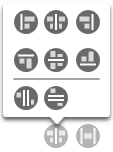
In the centre of the lower area of the diagram view, there are two buttons which reveal other buttons when you hover your cursor over them. These buttons allow you to realign and resize elements in a diagram.
Transfer Existing Elements into a Diagram
To add existing elements into a diagram, click firstly on the Add Existing Elements button, which is just below the Arrow in the toolbar. Then click on a free space within the diagram; this opens a selection dialog. Choose an element you wish to transfer into the diagrams. If you wish to transfer multiple elements at the same time, hold down the shift bar whilst selecting your desired elements.
Edit Diagram Elements
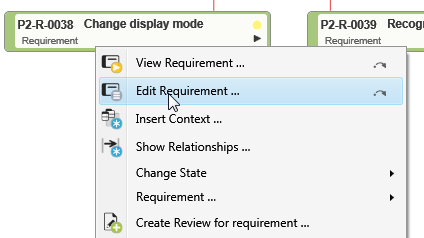
All diagram elements and their relationships have a context menu that you can access. To open it, right-click on an element or relationship line. To edit an element or relationship in the chart, execute the context menu command Edit.
The small triangle in the element header also expands the element in the diagram, allowing you to directly provide the element with a description.
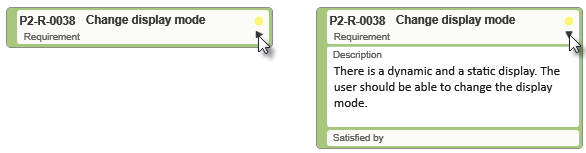
If you want to rename an element, double-click the name to activate the edit mode.

In use case diagrams, click on a symbol with the mouse and move the mouse to its edge. You can change the size of the symbol at the displayed handles.
Print Diagrams or Copy as Image
Right-click on a diagram’s background to open its context menu; from here you can print the diagram or copy it to your clipboard.
Hide or Delete Elements
When it comes to removing elements from a diagram, you have two options; permanently delete the element from both the diagram and system or simply remove it from the diagram. To do the former, execute the Delete command in the selected element’s context menu. To do the latter, execute the Remove from Diagram command in the selected element’s context menu. When only removing an element from a diagram without deleting it from the system, any relationships that may have been established between it and any other elements still remain. To reinsert an element back into a diagram, you can either drag & drop it from the Products window, use the Add Existing Elements button, or execute the Insert Context command.
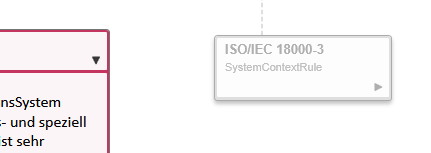
Insert Context
Elements in a diagram can have relationships to other elements that are not included in the same diagram. To see a full list of related elements, execute the Insert Context command in the context menu of a selected element. Any elements listed can be transferred directly from the selection dialog into the diagram.
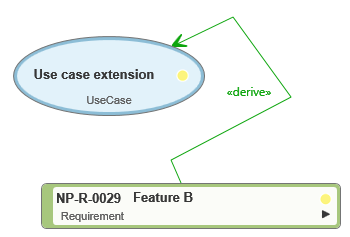
Straighten Relationship Lines
Relationship lines displayed in diagrams are sometimes crooked. To straighten them, either drag the line into the position you desire, or select the command Rearrange in the relationship line’s context menu.