Version 7.0 and higher
Set up collaboration
Starting with version 7.0, you can use the Collaboration functions, which allow you to conduct live chats and video conferences directly in objectiF RPM. In order to use these functions optimally, you need a valid certificate and you must set up SignalR and Node.js for the web service.
Certificates
If you have installed objectiF RPM Server and the Client or Web Service (Web Client) on one computer, you will need a valid certificate that is not self-signed. If objectiF RPM Server and the client or web service (web client) are installed on different computers, you will need an additional certificate which is also not self-signed. For this case, it is recommended to set up SignalR and Node.js where the web service is installed.
Self signed certificates
It is recommended not to use self-signed certificates because they are considered untrustworthy. You can use self-signed certificates for testing purposes. If you want to use self-signed certificates, install it on (each of) the computer on which objectiF RPM Client/ Web Client is installed. The location of the certificate store is LocalMachine. Install the certificate under Trusted Certificates.
Import certificate
If you have a valid certificate, you still need to deposit it in Internet Information Services (IIS).
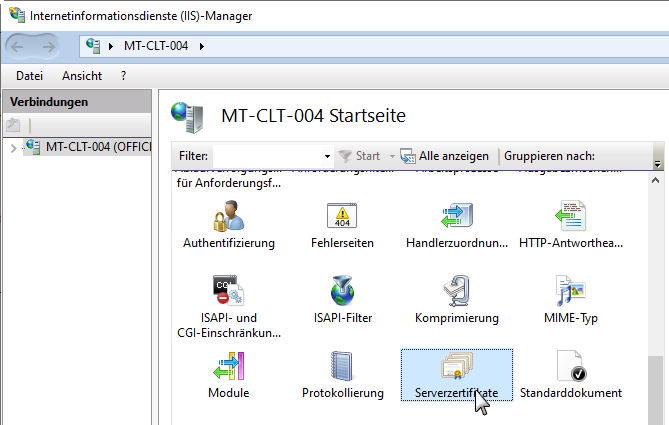
- Open the IIS Manager.
- Select the machine (top entry) on the left and double-click to open the Server Certificates.
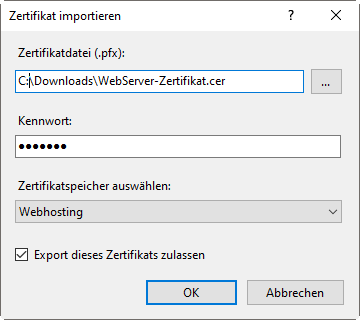
- Select Import on the right side.
- Click on the […] button to select the certificate, enter a configured password and select Webhosting as the certificate store.
- Confirm with OK.
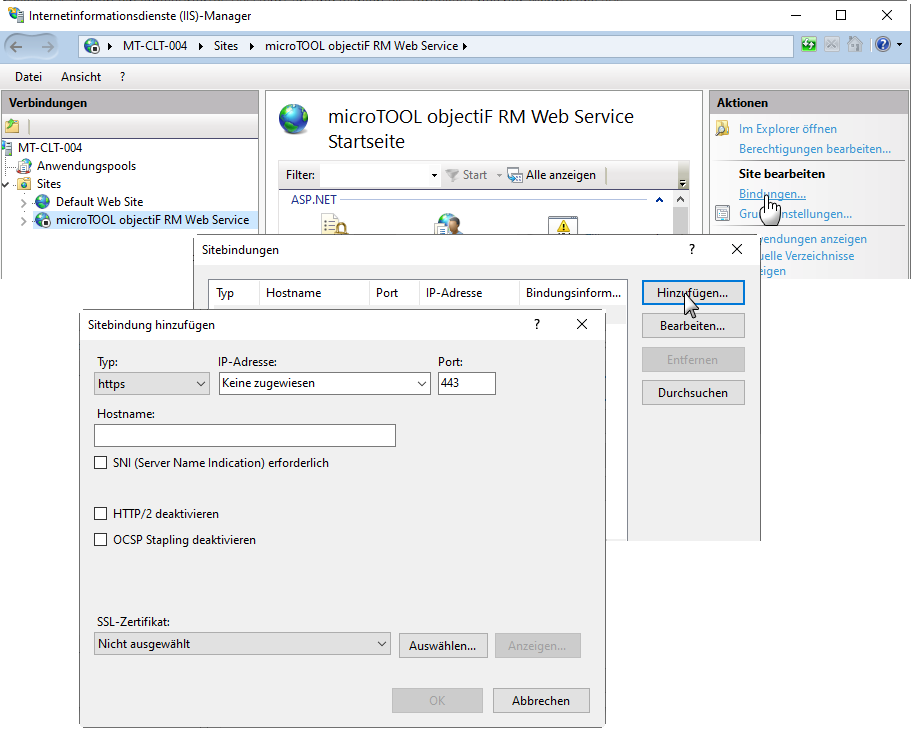
- Now select the WebSite in IIS and open its configuration by clicking Bindings.
- In the following dialog click on Add.
- Use the dropdown to specify https under Type and enter a free port.
- Under SSL Certificate select the imported certificate.
- Then start the web service by clicking Restart under Manage Server on the right.
Set up SignalR
With the SignalR server configuration, chat messages and invitations to video conferences are transmitted immediately.
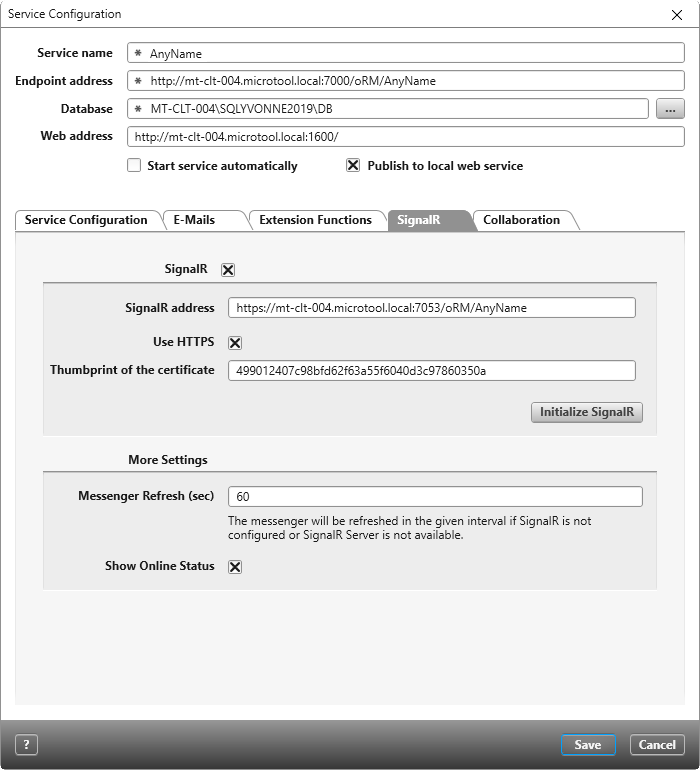
- Open the Service Manager of a web service and go to the configuration of the service for which you want to configure collaboration.
- Switch to the SignalR tab and check the SignalR option there. The SignalR address field is unlocked.
- In the SignalR address field, enter any free port after the host name following a colon.
- Select the Use HTTPS check box if you want to use the collaboration features in the web client as well.
- Under Thumbprint of the certificate, specify the value of the thumbprint (certificate for the SignalRServer).
- Click Initialize SignalR. The SignalR server is set up with the specified configuration. The port is released and the address is reserved. A message indicates whether SignalR has been set up.
Set up Node.js
If you want to do video conferencing, you need to set up Node.js. This is true even if you have already installed Node.js using the extension features.
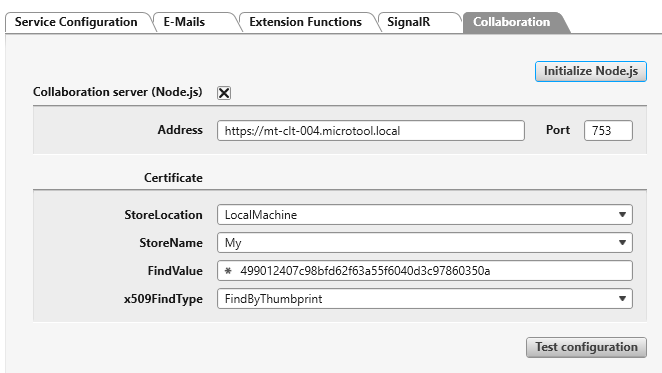
- In the Service Manager, switch to the Collaboration tab.
- Click the Initialize Node.js button. Wait until you get a message that the Collaboration server has been set up.
- Select the Collaboration server (Node.js) option.
- In the Address field, enter the address where you want the Node.js server to be accessible. It starts with https:// and is followed by the computer name.
- In the Port field, enter the port at which the Node.js server should be reachable.
- Enter the required Certificate settings under Certificate::
- StoreLocation Enter here the location of the certificate store where the certificate is installed.
- StoreName Enter here the name of the certificate store where the certificate is located.
- FindValue Specify here the value of the certificate attribute to be searched for. The value of the attribute depends on which certificate attribute you have selected. If you have already set up the SignalR server, it is recommended to use the thumbprint of the certificate as the value. Copy the value from the SignalR tab.
- x509FindType Specify the attribute of the certificate to search for.
- Click the Test configuration button to see if the settings are correct.

