Version 7.3 and later
Azure DevOps – Import and Export Requirements
With objectiF RPM, you have an interface to Azure DevOps. This allows you to import work items into a project, as well as export requirements out of one. These imports and exports to and from a project are performed via a configuration that need to have been created beforehand. Once a configuration has been created, go to the Backstage menu and under Project, open the dialog for Synchronize Azure DevOps Projects.
Create Configuration
The pre-requisites for creating the import/export configuration to connect with Azure DevOps are: Azure DevOps login credentials and a token generated directly from Azure DevOps.
- Go to the Backstage menu of a project and select Project/ Interface Configurations.
- In the Interface Configurations view, click on the green Plus button and select Create configuration for Azure DevOps.
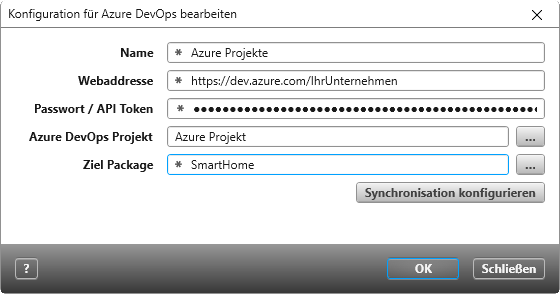
- A dialog will open. Fill in all the data entry fields.
- Click on the button for Configure Synchronization.
- Click OK to confirm your choices.
In the view for Interface Configurations, you will see the newly created configuration. To alter the name or connectivity data, open the configuration’s context menu and select Edit.
Configure Synchronization
In this section, you can configure the mapping between objectiF RPM and Azure DevOps. If you wish to change any mapping features at a later date, select the configuration in the view for Configure Synchronization and execute the command Edit in the configuration’s context menu. In the editing dialog, click Configure Synchronization.
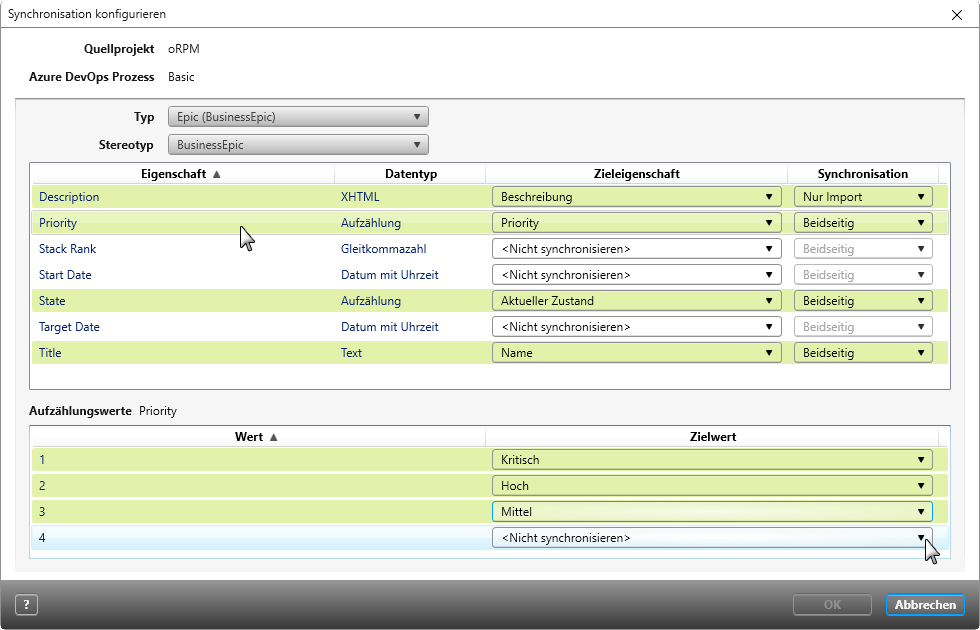
- In the section for Azure DevOps, select the type you wish to import/export.
- In the section for Stereotype, select the stereotype you wish to use when mapping Azure DevOps. If you don’t select a stereotype, you will see the value <Do not synchronize>. If you select a stereotype that has already been assigned to a Azure DevOps type, you will be present with warning next to the entry that looks like this:
As soon as you have made your assignments, the mapping overview is activated. Rows highlighted in green indicate that mapping has already automatically taken place for the property. Assignments made within the tool can be changed. Properties that have yet to have been mapped have the value <Do not synchronize>; leave it like this if you don’t want these properties to be imported/exported. In the column for Syncronization, enter when the properties should be transferred. If you have properties of the Enumeration type, you also need to assign them to Enum Values.
- Map the properties and property values (if there are any) and specify if the assignment applies to an import or export.
If you wish to import or export more than one type, repeat steps 1 to 3.
- Click OK to save your choices.
Import and Export
- In the Backstage menu go to Project/ Synchronize Azure DevOps Projects.
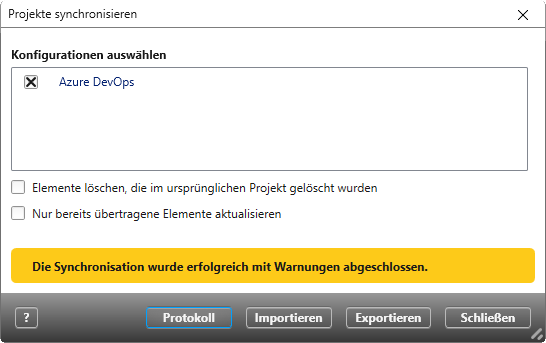
Alternatively, in the view for Interface Configurations, you can also trigger the import or export through clicking Synchronize in the context menu of the relevant configuration. - In the dialog, select the configuration(s) you want to synchronize. You can also decide if elements should be deleted or updated during the import/export.
- Select the desired options.
- Click on Import or Export depending on what process you wish to trigger.
Once the import/export is complete, you will see a confirmation message.
Via the Log button, you can see what has and has not been transferred.


