Jira – Import and export requirements
objectiF RPM offers you an interface to Jira with which you can import issues into your project or export requests as issues to Jira again. You must first create a configuration that allows you to connect to Jira.
Add configuration
- Within a project, switch to the backstage menu and select Project/ Import Configurations.

- In the Import Configurations view you can create a connection to a Jira system by clicking on the green plus button.
- In the following dialog enter the connection data for the Jira system and select a package into which the issues are to be imported.
- Click on the Load projects button.
objectiF RPM connects to the specified Jira system and displays the projects that you can access in the Select Projects field. - Select the projects from which you want to import and click OK.
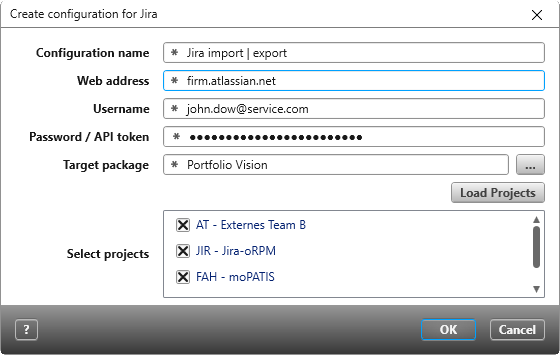
- The Import Configurations view now displays the created configuration.

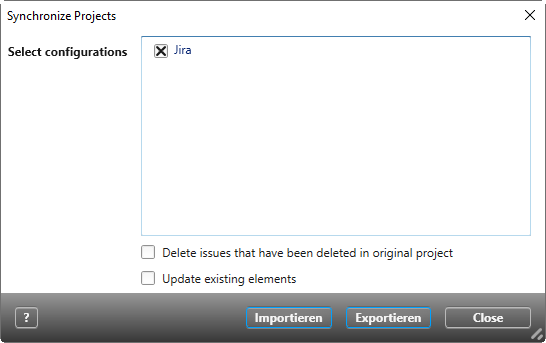
You can use the Edit context menu command to change the name and connection data. With Delete you can remove the created configuration from the view and delete it. With Synchronize you can import, export, or update issues or requirements.
Import Issues
You can import issues using the Import Configurations view, which you call from the backstage menu of a project using the Projects Synchronize Project command.
When you import issues from a Jira system, the following properties are created in objectiF RPM:
- a package with the name of the Jira project
- imported issues are created as requirements
- the stereotype <<Requirement>> is extended by the issue types
- Jira properties are created as user-defined properties in the requirement.
- Select a configuration in the Import Configurations view and click the Synchronize command in the context menu.
- If you have already imported issues from Jira, you can use the Delete issues that have been deleted in original project option in the subsequent dialog to specify that deleted issues are also deleted in the project.
- Click Import to start the import. The import is completed with a message.
The issues are stored in the specified package.
Export requirements
Requirements can be exported using the Import Configurations view, which you call from the backstage menu of a project using the Projects/ Synchronize Project command.
Hint
In order for the export to work, make sure in objectiF RPM that the requirements:
- have a stereotype that also exists in the Jira system, and
- are in a state that exists in the Jira system.
- Select a configuration in the Import Configurations view and click the Synchronize on command in the context menu.
- If you have already exported requirements to Jira, you can use the Delete issues that have been deleted in original project option in the subsequent dialog to determine that deleted requirements are also deleted in the project.
- Click Export to start the export. You will receive a message when the export process has been completed.
Possible messages during import/export
If the import/export was successful, you receive the following message:

The export/import process is terminated if the requests have the wrong stereotypes and if they are in the wrong state. A message informs you why the process was canceled.
