Working in backlog views
Backlog views display all the requirements in a package and provide options for creating, refining, changing, and prioritizing new requirements. Requirements can also be grouped, sorted, or edited directly.
Information in a backlog view
In the upper area of a backlog view, you can read various information, such as the name of the package where the requirements are located, as well as the total effort involved in the requirements.
Domain backlog

Release backlog
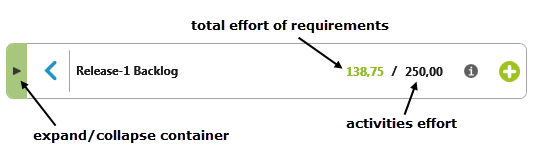
The front number appears in green or red. Green indicates that the effort of all requests is less than the planned effort of the activity. You can drag additional requirements to the activity. Red indicates that the activity is already overplanned. In this case, you should reschedule requests and drag them to another activity.
In the upper right area of the view, you will find various buttons that influence the display of the data:
| |
Displays the filter settings. |
| |
Removes all filter settings. |
| |
The column names (name, rank, status, and so on) of the view are displayed again. |
| |
The column names (name, rank, status, and so on) of the view are hidden. |
| |
Hides the grouping name (status, rank, etc.). |
| |
Shows the grouping name again. |
Create new elements
You can add to the backlog by using the plus button to create new requirements or by dragging requirements from the product view into the domain backlog container.
If you drag requirements into a domain backlog, you can see in the upper part of the respective container how high the total effort of the requirements is. If an activity has already been assigned to the domain backlog, you can see whether the activity is already overplanned or not.
Sorting
You can sort requirements (in alphabetical order, from the largest to the smallest value, and vice versa) and arrange them so you can find items faster. This is especially useful when the view contains many requirements, use cases, and so on.

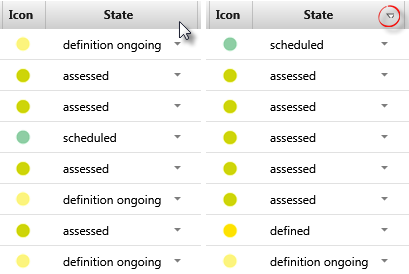
Sort requirements, use cases, etc. according to their properties by clicking on the respective column names.
Group
For a better overview, you can also group elements according to their columns. Drag the desired property (e.g. state) to the gray area above the column names. This groups the requirements according to states. This allows you to concentrate entirely on the group of features in the evaluated state.

The requirements are now grouped by their states and displayed in a list. You can see in parentheses next to each state how many requirements are in that state.
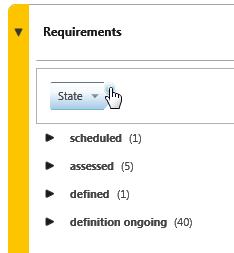
There are 47 requirements in the backlog requirements. One of them is scheduled, five are assessed, on is defined, and 40 have the state definition ongoing.
You can undo the grouping by clicking on the x in the grouped column.
Show relationship
when you click on a requirement, relationships to other requirements are displayed through highlighting in the view. The requirements that are related to the selected requirement are also indicated by an icon that tells you what type of relationship they have to each other. This feature of the view is useful, for example, if you want to define the ranking of epics that have arisen from a feature through refinement.
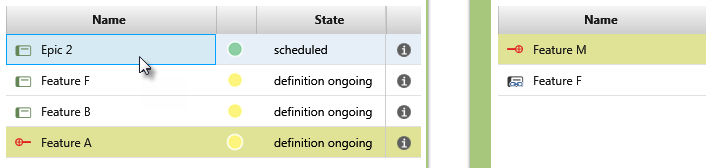
If there are relationships between the requirements, these are highlighted visually. On the left, the requirement Epic 2 is selected. You can see at a glance that the requirement Feature A and Feature M are related to Epic 2 and the direction of the relationship. The crosshair points to Feature M, indicating that it is the parent requirement. Accordingly, Feature A and Epic 2 are the refinements of Feature M.
Edit rank
Define a ranking (e.g. 1,2,3 or 10,20,30 or similar) to show which features, epics and user stories should be implemented first. Rank expresses how important it is to the stakeholder that the requirement is implemented. By default, a requirement etc. is ranked 50. Change the rank by clicking in the column and entering a new value. The item is then moved up or down in the list.
The rank can also be changed by clicking on the element and dragging it between two elements or onto an element while holding down the mouse button. The element then takes the rank of the element to which it was dragged.

The requirement Feature A has the rank 0. The requirement is dragged to the requirement Epic 2 using Drag & Drop. Since Epic 2 has a rank of 20, the requirement Feature A has rank 25 now.